
DIY speaker stand

High-quality speakers have to be positioned exactly so as recommended by
the manufacturer. The frequency response of a speaker is significantly
affected by the size and the geometry of its baffle. This baffle does
not end at the lower edge of the box, the stand also has acoustic
influence.
If a box was designed for a free-floating
position, then you have to guarantee
this acoustic environment. Otherwise you will get a lot of
reflections which results in an imbalanced frequency response.
The speakers you see on the left are desigend by the German ME Geithain
company. To many hi-fi enthusiasts they are an insiders' tip.
ME Geithain has a very good reputation in the studio domain.
Their monitors are often used when it comes to absolute fidelity.
Extremely low distortions are combined with a very flat frequency
response. This would suffer when those speakers are not placed at
stands that meet the geometrical requirements.
Of course ME Geithain sells matching stands. But we needed only one stand,
because the second speaker could be mounted on the wall. So one had to
work yourself.
Besides the optical and acoustic restraint a second design criterion has been children's safety. We wanted that our young toddlers can not pull on cable. That's why the speaker cable should disappear inside the stand.
Construction of the speaker stand
Materials needed:
- 1 table leg made of metal pipe (hardware store) with a screwed-in plastic end piece (here 87 cm long)
- 1 plate of 11-ply plywood, cut at the hardware store, at most as large as the bearing surface of the speaker (in this case 20 × 20 cm)
- Flexible plastic pipe (hardware store), about 1 m long
- A wiping cloth made of foam rubber
- Good tools for drilling large holes in the metal tube (metal drill, cutter, round file)
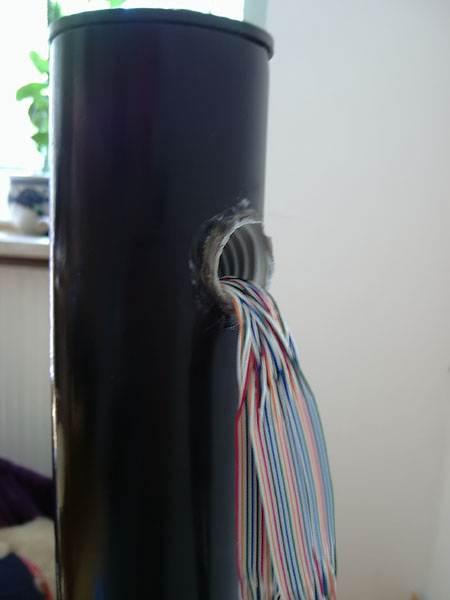

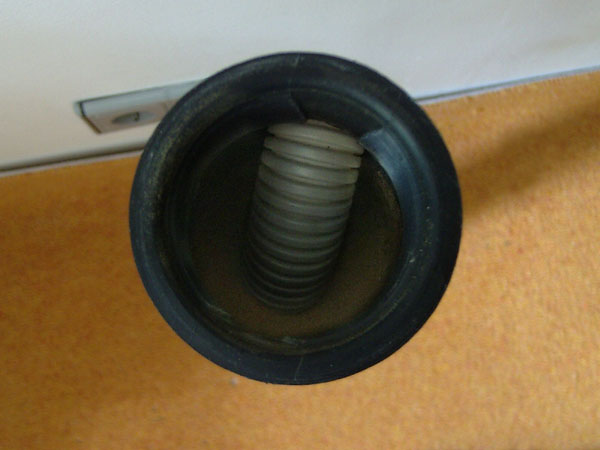
Figure 2: Upper exit hole, bottom exit hole and look into the open tube.
The most difficult task is getting two holes into the metal pipe. With ordinary household tools is a bit difficult. In any case, we first draw the opening and drill first with a small metal drill. I have drilled several small holes around the entire circle and then expanded holes with a larger drill. An automatic jigsaw for metal could help, but you have to ensure that the tube is clamped absolutely firm and cannot twist. The round opening has not to be 100% accurate, because the cable conduit will be fixed later with some grout in the hole.
After cutting the holes you can pull in the elastic cable conduit. It is a bit bulky to handle. After that both openings were saled with grout (silicone), for the stand will still be filled with sand then. The joint compound can be of any color, it will be painted black later.
Now the sand got into the pipe. You can see the sand in the third picture.

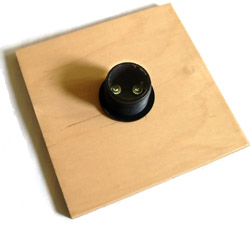
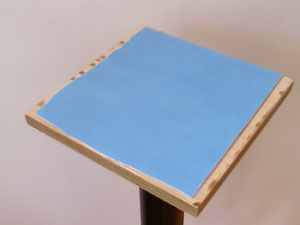
Figure 3: Base mounting with screws. Cover plate with attachment threads.
Now the stand can be bolted to the floor.
If you do not want to screw into your floor,
you could place the metal base to a large base plate made from plywood.
Thus, the speaker stands secure this must base plate must be larger then the top plate,
so the pivot point of the base plate lies outside the center of gravity
of the box. This base plate can be plastered with a piece of carpet at the
bottom, or it can rest on spikes.
Visually more appealing would be to cut a pipe diameter hole into the base plate, and put
it from top at the metal plate of the tube.
In the last step we screw the upper part of the plastic cover of the pipe at the down-side of the upper wooden plate. (Fig. 3b) Since this cover can be rotated just a few degrees, you first have to screw the lid tightly into the pipe and then label the exact position of the lid at the wood plate.
With the sand filling inside the pipe has a good acoustic attenuation. Also the contact space between stand and speaker should be acoustically dampened. A wiping cloth serves for this purpose. In addition, it provides a non-slip state of the speaker. Done.

Side view of the stand with threaded speaker cable